Kimberly Servello's Embroidery Blog

Kimberly Servello - Pattern Drawer and Embroideress

Thursday, December 29, 2011

Sampler Bits Ornaments


 'The holly’s up, the house is all bright
 The tree is ready, the candles alight,
Rejoice and be glad all children tonight.'


German carol 

These first two ornaments have details taken from the same sampler as that which inspired my Christmas stockings.  The sampler is titled a Pattern Record (circa 1625), and is available from Scarlet Letter.


Both are trimmed with purchased cording. 


The red ornament is backed with moire fabric in a red to match the embroidery.


The green & gold ornament is backed with gold velvet.


The technique for both ornaments, once again, is blackwork, using Au Ver a Soie : soie d'alger, one strand.  35 count linen.


The third ornament, a needle roll, has two bands from the same sampler as the two ornaments above.  


Additionally, the central acorn & oak leaf band is a 16th or 17th century Italian band.  The band was included in Old Italian Patterns for Linen Embroidery, by Frieda Lipperheide, translated and edited by Kathleen Epstein.

The needle roll edges were hemmed using an antique hem stitch. ( You can find my instructions for this hemming technique under 'Stitch Instructions' on the right hand bar of this blog.)

Materials used:  Au Ver a Soie : soie d'alger, one strand.  35 count linen.

I like to display ornaments such as these, without either a strong, or a true Christmas motif, all year.


Saturday, December 24, 2011

Boxers Ornament for Boxing Day


Health, love and peace be all here in this place

By your leave we shall sing, concerning our King
Our King is well-dressed in silks of the best
In ribbons so rare no king can compare...


from a traditional carol 


I made this ornament in 2004, taking the motif from an old sampler.  It's worked in reversible blackwork or double running stitch using a single strand of silk.  The twisted cord was made with the same floss.

Many 16th -18th century samplers feature the male figures shown here, known today as "boxers".  I don't know if the boxers featured on samplers have ever been linked to Boxing Day.  It's just a concept that has  evolved in my warped thinking processes.

I believe the term Boxing Day, designating the December 26th holiday celebrated in Britain, originated during Queen Victoria's reign.  However,  the concept of giving the poor and people in service jobs, gifts in boxes on 12/26 may date back to the Middle Ages.

Jacqueline Holdsworth discusses the boxer figures found on samplers in the latest book published by Needleprint, titled, The Feller Needlework Collection: 1 (yes, there will be a part 2!), by Mary M. Brooks, Elizabeth Feller and Jacqueline Holdsworth.  The following excerpt is from the Feller book:

Boxer Ornament displayed with my cranberry transferware collection
"...features well-known figures that have been termed boxers long enough for the label to stick without in in any way designating their real identity.  Boxers they most certainly are not.  The do, however, conform to a type:  a male portrayed sideways, walking and extending an offering, usually floral in nature...There are many theories about these characters, some say that they derive from earlier forms in Italian needlework; that the intervening vase was once a dancing woman..."
(excerpt from page 154).


If you don't own a copy of the Feller Needlework book already, I highly recommend that you obtain one.  This first book features the early English works, including samplers,  of Micheal and Elizabeth Feller.   Like the other Needleprint publications it's not only a beautifully presented and well-researched book, there are lots of close up photos, making it possible to determine what stitches were used.  

For each piece presented, and there 186 pieces, the materials and stitches used are given.  The pieces include coifs, nightcaps, sweet bags, gloves, panels, samplers, a casket, mirror and even a pair of shoes. 

Also included are many essays about the origins of design and discussion of motifs.  Speaking for myself, this book is a design inspiration I will draw from for years.

Friday, December 23, 2011

Variations on a Holly Theme


          "Again at Christmas did we weave
The holly round the Christmas hearth;
The silent snow possessed the earth,
And calmly fell our Christmas eve"

Tennyson


Many of you will recognize this holly motif from a coif at the V & A Museum. (acc no. T.25-1975).  It's been dated between 1590 to 1600; silk and silver-gilt embroidery on linen.  There are at least two coifs featuring this holly motif in a repeat fill pattern.  Unfortunately, I have photos of the 2nd coif, but didn't record where it came from.  

On the V&A coif, all 3 leaves are filled with a simple blackwork running stitch motif.  On the 2nd coif, the top center leaf has a heavy center vein worked in silk.  It doesn't appear to have a fill stitch and I can't make out what stitch comprises the vein, but it looks like Chain or Van Dyke.  I can't post a pic of it on my blog since I didn't take the photograph.  If anyone knows of another coif with this holly pattern, please let me know via a comment or email (kservello@comcast.net)

For the Holly Pocket Ornament shown at the top, I used Au Ver a Soie's (silk) 109 perle and 945 gobelin and #4 gilt smooth-passing wire on a sandy colored 40 ct. linen.  Stiches used are Outline, Blackwork fill and Reverse Chain.


On the Holly Mini-Pillow, above and left, I decided to try 50 ct. linen - I wanted to see how difficult it would be to stitch my delicate fill pattern on 50ct.  It's wicked-close and I don't think I would try it on a large piece, like a coif, unless I was only filling a few spot motifs with it. The same threads were used as the first ornament.


Here you see how I chose to fill the holly berries. I couldn't see how they were filled on the V&A coif, so I decided to fill them with reverse chain stitch.  I think it came out very nicely.

I made these in 2008.  Looking at the V&A coif again today, I realized the  goldwork stitch in between each holly motif looks like the cross variation of Guilloche stitch.  Anyone else care to comment?  I've ordered a hi-def pic of it so I can see it better.


Here's the third variation, actually my first attempt.  I used French knots to represent the upper holly berries.  I should have filled the area in more with berries, but, in "real life" it doesn't look as sparse in that area, probably because the branch looks longer on camera due to the curve in the linen.  I also used Fr. knots to fill in the 2 meduim holly berries below, with and outline stitch around them, which looks very nice - it makes them look raised.  Today I'd choose Spiral Trellis stitch.

Thursday, December 22, 2011

Materials or Kit to make Mistletoe Scarf, including the fringe

I can now offer the gold fringe, as well as the other fabrics, to make the mistletoe scarf.  It's available at my etsy shop.  (click link on right hand bar to go to my etsy shop).


If you would like to purchase the entire kit, including the threads, please contact me at kservello@comcast.net


Tuesday, December 20, 2011

Mistletoe Scarf That Could Have Been Worn to King Henry VIII's Coronation


"Their own apparel and that of their horses was of black velvet, covered all over with branches of honeysuckle " of fine flat gold of damask, of lose worke, every lefe of the braunche mouing, the embroudery was very conning and sumpteous."


...from Hall's Chronicle containing the History of England of Henry the 4th to the end of the reign of Henry the 8th  ( 1548 and 1550 editions)


My inspiration for this scarf came from the preceding passage - a description of King Henry VIII's coronation procession.  When I read this excerpt I could see the horse trappings and banners with embroidered honeysuckle leaves, moving in the wind, as the horses and men progressed.  


At the time I read this passage,  I also happened to be  looking for an idea for a Winter / Holiday scarf....

Wouldn't mistletoe leaves look lovely and lend themselves to "moving in the wind" on a scarf?  

...The leaves would be formed from detached buttonhole stitch, which would be stitched on a couched outline on linen, and then cut away and fastened to the velvet.   (A much simpler process than it sounds.)

And there must be gold, real gold, as King Henry VIII's  procession would have had.  Branches worked in chain stitch in gold wire and gold spangles would answer to that.


To make it even more life-like, the mistletoe berries could be worked in spiral trellis so they stand away from the fabric,  seeming to be real berries.

 I recalled the gorgeous aubergine velvet I'd bought at a local shop -  not knowing what I'd do with it at the time - but unable to resist its luxurious look and feel.  It's a cotton velvet - unusual nowadays - with an exceptionally dense pile.  

The embroidery, and most of the assembly, was done last winter.  I wanted the perfect fringe to finish it, and couldn't find it locally.  It had to be a fine and rich looking gold.

  At last, a few weeks ago, my neighbor took me to NYC to enjoy the Christmas festivities.  During our visit I stopped in at Tinsel Trading Company.  I'd wanted to visit them for a couple years, and I had pinned my hopes on finding a fringe for my scarf there.  I wasn't disappointed.  The richness of it is perfect for the gold embroidery. 

 If you get the chance to visit Tinsel Trading do so!  I was like a child in a candy shop  - I wanted one of everything!  They have vintage, new and reproduction notions, displayed in old-world style, custom cabinetry.


I lined the scarf with a gold and silk gauzy fabric, found locally.


Voila - a scarf was born.  Can you see it in King Henry VIII's procession, moving in the wind, as I progress on horseback?


Mistletoe appears in the great herbal book of Leonhart Fuchs, De Historia Stirpium, published in 1542, which is known to have been available in England.

In England, the first written mention of mistletoe, in context with Christmas, appears in 1622, seemingly not a new custom by that time, although possibly regional.  (Reference Life in Elizabethan England)


Threads and stitches used on the Mistletoe Scarf :  
Spiral Trellis for the berries using Au Ver a Soie Perlee thread in color 211 - off white
Needlelace for the leaves using Gilt Sylke Twist (GST) thread in Gawdie Green -
   They were attached to the scarf with 3 or 4 back stitches that represent a center leaf vein
Reverse Chain for the branches in #4 Smooth Passing gold wire by Golden Threads
#4 gold spangles from Access Commodities
Glass Seed Beads from Mill Hill, color 00123

Finished scarf dimensions :  5" wide x 72" long, not including fringe.  Fringe width = 1-1/4"


Sunday, December 18, 2011

Pomegranate Christmas Ornament


Then here´s to the maid in the lily-white smock
Who tripped to the door and slipped back the lock;
Who tripped to the door and pulled back the pin,
For to let these jolly wassailers in.

Wassail! Wassail all over the town!

excerpt from the medieval carol  The Gloucestershire Wassail 


If you are familiar with my blackwork purse, Pomegranates and Peas, you'll recognize this motif. The motif is taken from a jacket at the V&A museum. I think I've seen this pomegranate, in speckling stitch, on another period embroidery, or maybe in a modelbuch or pattern.  Does anyone else know of it appearing somewhere else?  Please add a comment if you do.

This ornament was a test piece for the purse.  It's one of my early attempts at speckling.  I wanted to stitch the purse in reds, but finding varying silk thread thicknesses in the same red proved impossible.  Here, I used a sewing machine thread for the finest speckling (not a silk thread). 

 I feel the plaited braid vine is too heavy for the piece - I used a  #5 real gold passing thread with a cotton core, because the size 4 either wasn't available at the time, or I wasn't aware of it.  Also, the silk core wasn't an option yet.  This piece was done before the goldwork was added to the Plimoth jacket.  Tricia had the same issue on the jacket - the #5 passing with cotton core was too stiff.   Through working this motif, I decided to go with the much finer tambour metal thread for the purse.  I felt it was also a better choice for stitchers learning the plaited braid because the tambour metal thread is extremely pliable.

Regardless of these deficiencies, the ornament actually looks quite lovely, and only an experienced stitcher could pick out its blemishes.  It's backed with a matching red satin fabric, stuffed with poly stuffing and trimmed with a twisted cord.  The plaited braid vine and spangles catch the tree lights and sparkle.

When I choose an ornament to embroider for my tree, I try to choose something that reflects what I've been working on that year.  I date the ornament so my tree serves as a visual record of my journey as an embroideress.

It's late here, and I've been baking for Christmas all day, and as Samuel Pepys closed his diary on December 18th, 1668,  "and I to bed."


Saturday, December 17, 2011

And The Stockings Were Hung.....


 Lo, Now is come the joyful’st feast
 Let every man be jolly, 
Each room with ivy leaves is drest,
And every post with holly. 

George Wither 1660


Today many of us, myself included, pine for Christmas celebrations of the long distant past when we imagine life was simpler and therefore enjoyed more fully.

The world has become more worldly.  There is more of dissipation and less of enjoyment.  Pleasure has expanded into a broader, but a shallower stream, and has forsaken many of those deep and quiet channels where it flowed sweetly through the calm bosom of domestic life.

It may surprise you to find that the previous paragraph was written by Washington Irving in 1820.   The concept that previous eras were simpler and therefore enjoyed more fully isn't a new one.  In fact, it goes all the way back to Homer and probably beyond.  The excerpt above is from one of Irving's Christmas stories in The Sketch Book of Geoffrey Crayon, Gent, which tell of Geoffrey's Christmas holiday spent in a quaint old English manor house, where Squire Bracebridge has brought back the customs of Merry Olde England.  It's a fun Christmas read for anyone interested in old English traditions, not scholarly though, since Irving has romanticized them.  But, all the more fun for it!

 Christmas stockings are my theme today -  not an element of the Elizabethan's Christmas celebrations -  and mine are admittedly very Dickensian.  However, the embroidery on them is Elizabethan.

The main pattern on the first two stockings is taken from a portrait, circa 1540, titled Portrait of a Lady in White by Moretto da Breccia and housed at the National Gallery of Art, Washington DC.  I have also seen this blackwork motif on an English sampler, dated 1661, included in Louisa Pesel's book Double Running or Back Stitch.   At the time of publication, the sampler was in the private collection of Mrs. Clement Williams.


I worked the blackwork bands using one strand of Soie d'alger silk thread on 35 ct. linen.  The motif is mirror imaged on the burgundy stocking, giving it a very different look from the gold.

After the embroidery was completed and I had selected rich fabrics to go with them, I drew a very elongated stocking pattern because I felt it would go with the Dickensian look of the velvet, cording and tassels. 


The decorative rolled hem - the same used on some of my scarves - is the antique hem stitch from Therese deDilmon'ts book on Needlework.  However,  I added an additional pulled thread detail from the same book.  No instructions were given on how to do it, but a clear photo of the technique 'in process', on page 465, is enough for the experienced embroiderer to work it out.


For the last stocking, I decided to use one of my samplers for its original purpose.  The sampler is a reproduction available from the The Scarlet Letter.  The original was worked circa 1625, and probably intended as a record of patterns.  You can read about the dating and history of the sampler in the Sept / Oct 1993 issue of Piecework Magazine.


For the stocking, I used the same reversible stitches as the original sampler, with Soie d'alger threads on 35 ct. linen.

I simply took a section of the sampler and used it for the stocking band, adding the holly leaves, from another band, at both the top and bottom.  These stockings, stitched over 15 years ago, were my first attempt at adapting old patterns for my own use.


Tuesday, December 6, 2011

Elizabethan Embroidered Elements for Christmas


Saint Francis, and Saint Benedight, 
Blesse this house from wicked wight, 
From the Night mare and the Goblin, 
That is hight good fellow Robin. 
Keep it from all evill Spirits, 
Fayries, weezels, Rats and Ferrets, 
     From Curfew time 
     To the next prime. 

William Cartwright ( c. 1635)

I simply adore Christmas.  My holiday traditions hark back to other eras - Victorian, Edwardian and Elizabethan.   Whilst I know that Elizabethans did not have Christmas trees or stockings, I simply can't do without Elizabethan touches in my Christmas decorating.  Over the years, I've embroidered Elizabethan borders for velvet Christmas stockings that I designed, and stitched many Elizabethan themed tree ornaments.  Each year, I try to embroider a new ornament for the tree.   (Ok, the truth is that the ornament is embroidered in time for Christmas, but I don't usually assemble it until well into the next year! Ah well, the fun part is done in time, anyway).   

This Christmas Season, I'd like to invite you in to my home to see my Elizabethan themed decorations.  I'll post a few times each week, featuring a different ornament or Christmas stocking.  Before we get started, for anyone who would like to read about how the Elizabethans actually kept Christmas, here's an erudite site that my Virginian friend, Sharon, passed on to me:  click here to go to Elizabethan.org  It's a great website and has given me some ideas for future decorations.  You'll have to visit my blog next Christmas to see them!  For now, on to my Dickensian-Elizabethan Christmas....

The photo shown above is of my tree, tucked in to a corner of my kitchen overlooking the back garden.  Several years ago I decided to down-size my Christmas tree, which allowed me to use only my Elizabethan inspired ornaments.  Many of my ornaments are mini-pillows.  Often the motif highlights a technique or design I'm experimenting with for a larger piece.  

The motif on the ornament shown here probably represents a pomegranate - my favorite motif.  It's a detail I took from a panel design included in The New Carolingian Modelbook - Counted Embroidery Patterns from Before 1600 by Kim Brody Salazer  According to Kim, the original panel design was published in 3 design model books:  the first printed in Italy circa 1530-1540 by Domenico da Sera, titled Convivio Delle Belle Donne.  He published it again in 1546.  The third book was published in Venice in 1561 by Giovanni Ostaus in La Vera Perfezione del Disegno.  All 3 books were printed using woodblocks.  I've looked through the online copy of La Vera Perfezione del Disegno and can't find the pattern.  Perhaps it's in another copy.  It's a great resource for period patterns, and the online copy is free.


For this ornament, I used an overdyed cranberry floss and worked it in Italian Cross Stitch so it would be reversible - a bit obsessive since you can't see the back!  This design would look fine done in cross stitch.  The fabric is 40 ct. Italian linen in a tawny gold color.  To assemble it, I backed it with a piece of cranberry cotton damask from my stash.  Next, I attached a beaded cord around the edge, simply looping it at the top to create an ornament hanger.


Monday, December 5, 2011

Patty G's Spin on my Blackwork Purse (Pomegranate & Peas Purse)

While I was attending the needlework conference at Winterthur in October, I saw an unexpected sight - my blackwork purse... on someone else!  I'm new enough at designing and teaching that it still shocks me to come across one of my designs being used by someone else.  Shocks in a pleasing way, of course.  The purse was stitched and worn by Patty Smith Gardner, from Pennsylvania, who approached me during morning break to show me that she was wearing it.  She had attended my EGA Regional class in 2009.  I remember Patty's enthusiasm for the project during class, which helped me to overcome the nervousness I felt teaching my first class comprised largely of people I didn't previously know (my prior classes had been taught at my local EGA chapter).  I believe she finished her purse, including assembly, in a little over a month.

Patty did a great job on the embroidery.  Notice that she chose to outline the scrolling gold vine (plaited braid stitch) in black stem or outline stitch.  My design did not include this.  In class,  I shared slides of period pieces done in speckling technique and pointed out that sometimes the plaited braid vine was outlined.  Patty chose to add it and it really makes the gold 'pop'.   If you would like to compare it to my purse, click here.

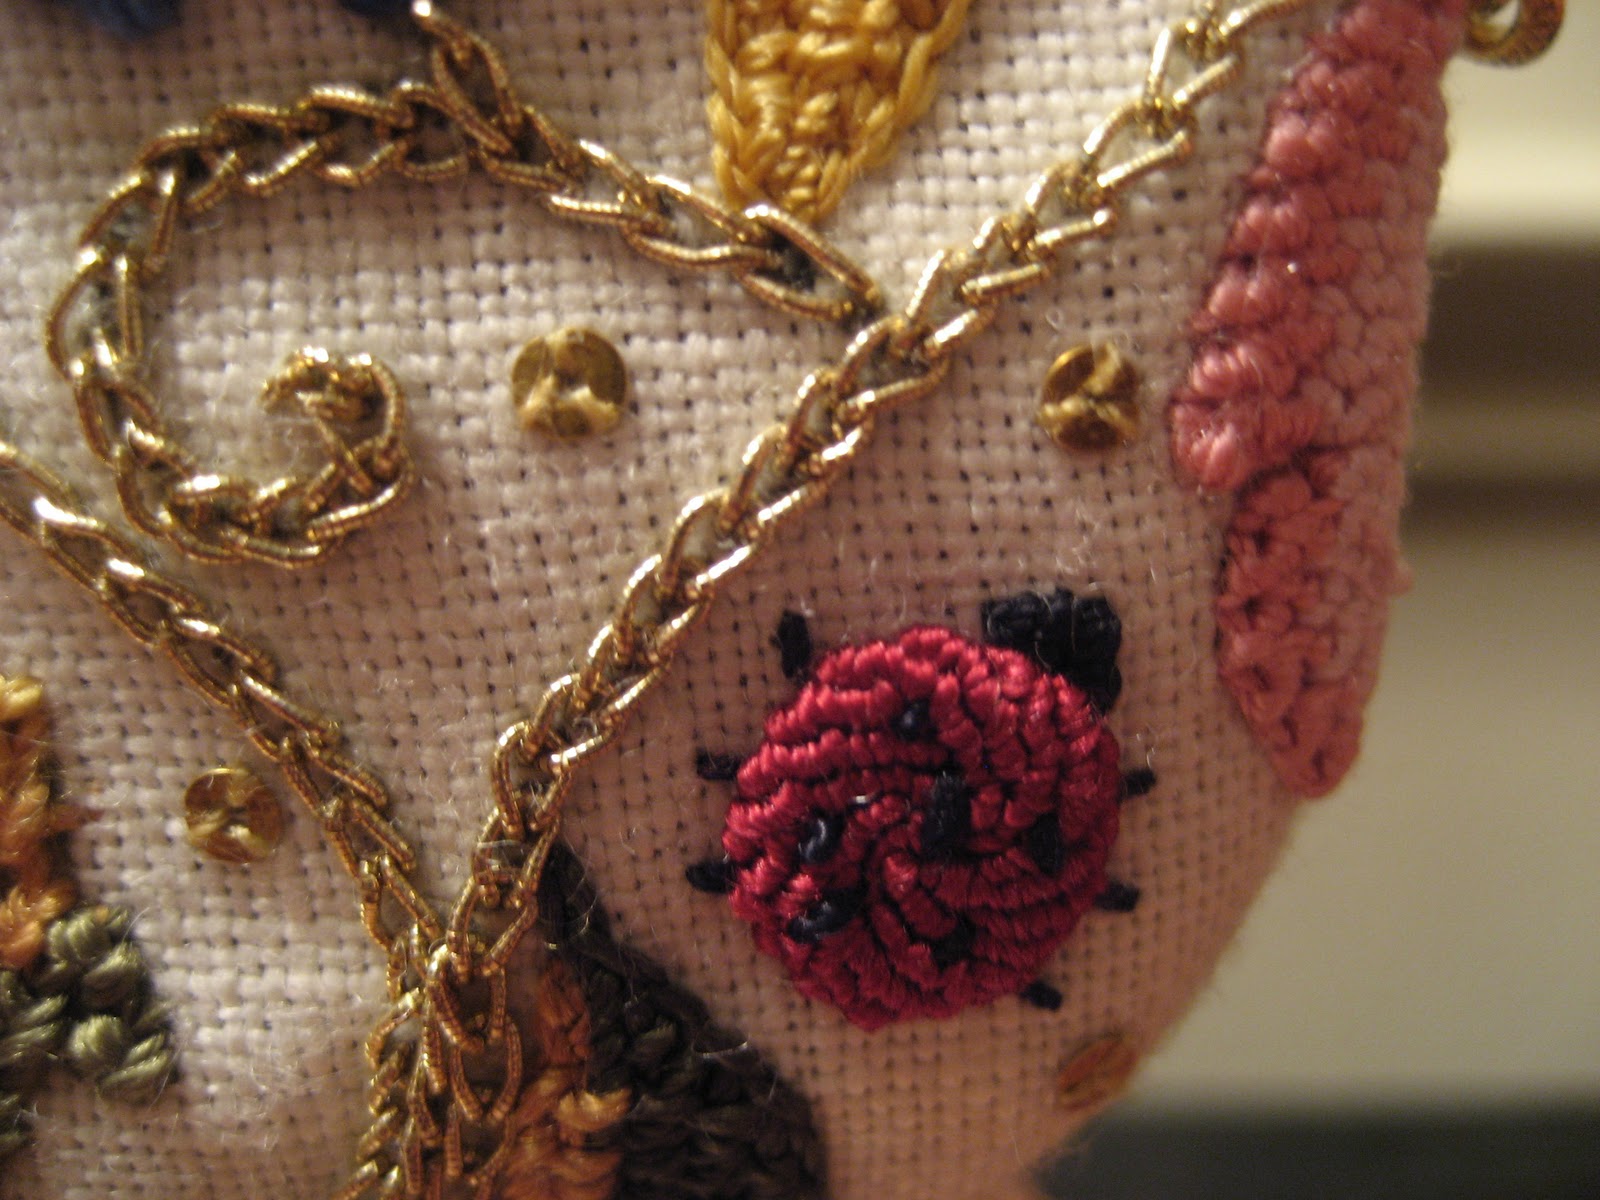
Also, she enjoyed speckling so much that, as she put it, she went a little speckling crazy. The speckling looks great - even though she termed it 'speckling crazy', it's not at all overdone.  She just chose to add her own individual elements, such as in the seed area of the pomegranate, where she added a pattern to the background of the seeds, rather like a shadow.  That's what's so much fun about speckling - it's a technique that easily lends itself to individuality.


I love how Patty finished her purse - completely different from mine! She added a long, beaded chain, choosing bead colors that matched those in the purse, and also chose not to add the bauble at the bottom.  In the photo to the right, you can really see the beautiful chain she made to go with it.  It's perfect for the purse.

Update:  Patty has informed me that the chain is a tubular herringbone/Ndebele with four beads around.


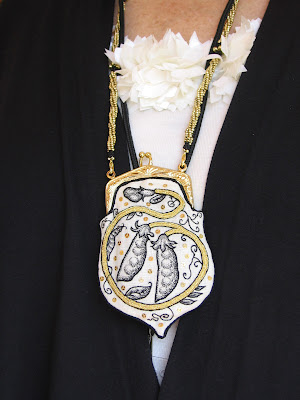
Here's the purse 'in action' at the seminar.  The black cord behind her beaded cord was for our seminar name-tag.  It looks great with her outfit - an eye-catching accessory.


Great job, Patty!  Thanks for sharing your photos with us.
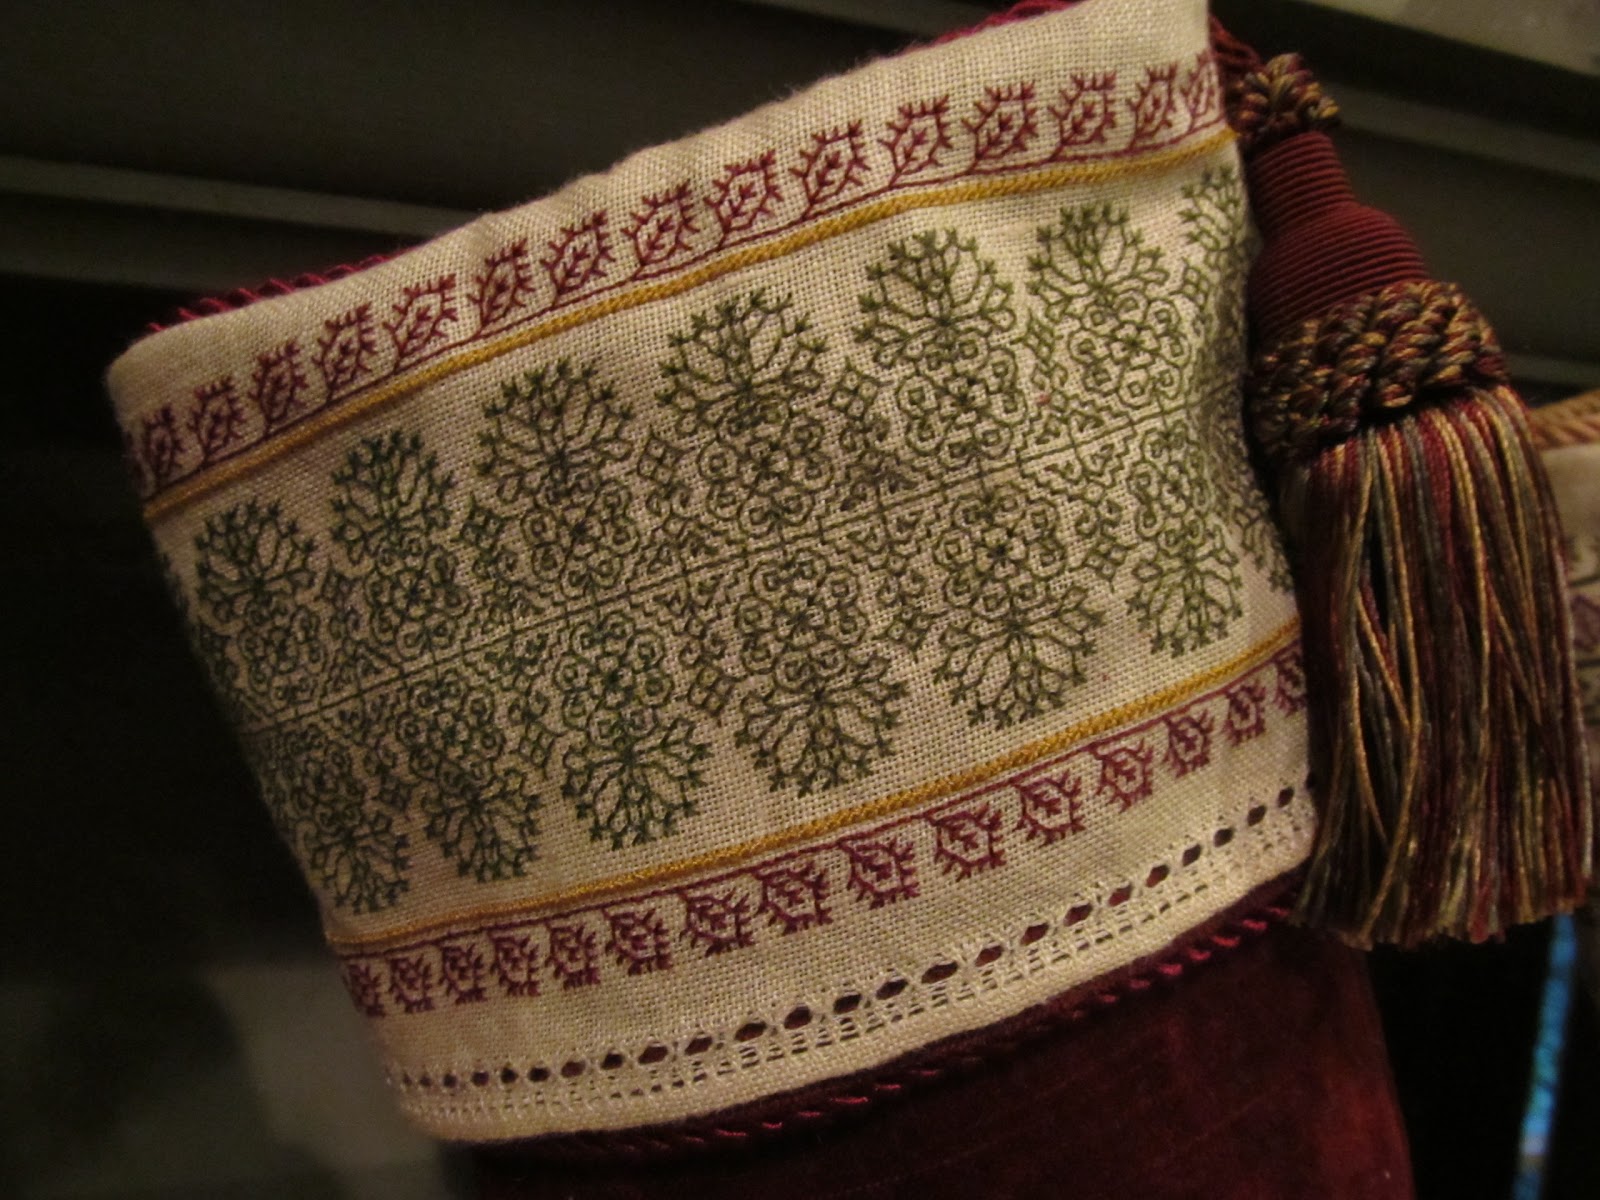


Thursday, December 1, 2011

Antique or Rolled Hem


 I'm hemming the edges of this scarf using an antique hem from Therese deDilmont's book on Needlework.  It's a rolled hem.  I used a regular white sewing thread, dual duty, fine.  Use a thread that matches your fabric color, preferably linen or cotton / poly.
 I thought I'd describe first how I prepare the linen to hem my scarves (works well for table linens, too).

I usually leave 3/8" between the cut edge of my linen to where I pull threads to make the somewhat open look of the hem.  Here you see the scarf, after it's been removed from my slate frame (an embroidery frame similar to a scroll frame).  I'm trimming the 1/2" of excess linen off the edge.  That was the area I used to lace my material onto the frame.

You can see here that 3/8" in from the edge of the linen, I've pulled 2 threads.  This is 60 ct linen.  If it were 36 ct or courser, I would only have pulled one thread. 


Starting at one long edge, knot your thread and weave the thread thru an inch or so of the linen so that the knot will be hidden within the rolled edge of the linen as you hem. Roll your linen as shown at left (click on photos to enlarge).  Bring the needle up thru the linen as shown and then pick up a group of threads in the pulled thread area as shown.  Pull your needle thru (see right photo)


Now, bring the needle up thru the linen again and repeat the above process. 


Spiral Trellis Stitch Instructions


Spiral Trellis was used here to create the Ladybug's body with silk perle thread.  

Notice the spiral effect of the stitches.


Needle and Threads:
   This stitch is best worked with a tightly twisted thread, like perle or gobelins, (use #8 embroidery needle for perle, #9 for gobelin).  Trebizond silk was used for this tutorial to make it easy to see the individual stitches. 

Spiral Trellis, as its name implies, is worked in a spiral, making it perfect for filling circular shapes.
Begin with an away waste knot, and outline the circle in back stitch.  If using perle thread, backstitches are about 1/8" long, shorter if using finer thread.


As shown here, to backstitch, bring the needle up thru fabric 1/16"-1/8"(depending on thread thickness) ahead of the last stitch.  Needle goes back down thru fabric against the last back stitch (sharing the same hole as last stitch).


Continue in this way until the outline is complete.


Once the circle is outlined, begin the Spiral Trellis by bringing needle up thru fabric between the first and last back stitches.


Looking down on the circle, the working thread has come up thru the fabric between first and last back stiches.  We will be travelling counter-clockwise.

Slide the needle under the first backstitch as shown.

Wrap the working thread around the needle exactly as shown here.  Be sure that the thread wraps over the needle first and then under .  The most common mistake in Spiral Trellis is to wrap the thread incorrectly in this step.


Keeping the wrapped thread in place (with a finger pressed against it if necessary), pull the needle the rest of the way under the backstitch.

When done correctly, a knot will be formed on the backstitch; pull the knot tight.


Continue counter-clockwise, repeating the last 2 steps until a knot has been formed on every backstitch...


Once a knot is formed on each backstitch, Row 1 is complete.  Take a second to look closely at the Trellis stitches.  Notice that on either side of each knot is a "leg" connecting the knots. To begin the second row of Trellis stitches insert the needle under the first leg of the first knot.

Below is a closeup of where the needle is inserted to start Row 2.  The knot on the right is the first knot of Row1; the needle is inserted under the leg.


As before, wrap the working thread around the needle and pull it through to form a knot.

Continue working the knots (or Spiral Trellis stitches) around and around to close up the circle.

As you progress, the knots will start to get crowded.  Skip a stitch occasionally, to alleviate the crowding.


To finish, plunge the needle down through the center of the circle, catching a bit of a "leg" on the opposite side, as shown here.

The only stitches appearing on the back of the fabric will be the backstitched circle.  Run the needle under 5 or 6 stitches to secure it and trim the excess.


Spiral Trellis worked in Trebizond silk thread


Try to cut enough thread to complete the entire process.  If you run out of thread part way through, or want to change colors, end the old thread after making a knot, by plunging the needle down through the fabric where the "leg" of the next knot would be.  Start your new thread with an away waste knot and bring the needle up through the fabric close to the last knot formed. Continue as before.